Tuesday, 20 December 2011

Editing, trimming of clips

In order to make the clips flow, we imported the clips into final cut express in large clips. Therefore, we were able to choose which ever part we wanted to include and cut it down to the size we wanted. Although, we found that this would make the editing harder. Therefore, we uploaded the large clips and edited them down to smaller, more manageable clips and saved them. 
This would therefore make the editing process easier as we were able to add the clips where we wanted them and not have unwanted footage confusing us.


Some pictures of this are shown below:


Sunday, 18 December 2011

Editing, adjusting of speed

For our music video, we wanted the footage to look more dramatic and emotional this was in order to make the audience sympathise with the female character. This also meant that the quality of the video would be improved as it would be more related to the story.


In order to create this desired effect, we decided to slow down the video. We used a lot of slow motion clips to carry out this effect. We roughly slowed the speed down by 60-70%. This created an effect of the girls life moving slowly around her.

Saturday, 17 December 2011

Editing - using livetype

In order to make the video look like a professional video, when editing we added the title of the song, 'Allie Moss - Corner', in the first few frames of the video.


Although, on final cut express we were unable to align the text in proportion with the picture so it was not in the middle of the screen. Therefore, we print screened the image of the text and opened it up into livetype in order to edit it to fit in line. 


We did however, face a few problems as none of us were very experienced with livetype. Therefore, we found it difficult to get the writing to the correct size. Although, after trial and error with the controls we were able to complete this task. An image of this is shown below:


Once we had finished editing the image of the title, we then exported it using quicktime movie and were able to import it fairly easily back into final cut express to place in the appropriate section of the song.


This is an image of the title over the video. 

Editing - using photoshop

We also used photoshop in order to edit some of our writing, at the beginning of the video we needed to include the students names and candidate numbers and the school candidate number. We used this in order to get the writing font size and colour so that the font stood out from the background and so that it was more spread out on the screen. 


In order to do this we needed to use the text tool in photoshop, in photoshop this comes up as layers. An image of the layers involved are shown below:


Once we had finished editing the image, we save it as a .png file, making it easier to import the image back into final cut express. 


An image of this is shown to the right.

Friday, 16 December 2011

Editing, creating a dreamlike feel

We wanted our montage section to appear dreamlike, therefore we wanted to include a faded outer edge. This would enable the images to seem more like they were from someones past. An image of the dimensions in which we changed is shown below:


In order to create this effect we used the vignetting tool on final cut express. This made the edges darker and blurred them slightly forming the dream like effect we desired. This is similar to other flash back materials used in other music videos.
Some examples of how we used the vignetting is shown below:


Editing; Changing the colour

In order to create a more vintage effect to our montage section at the end of the music video, we changed the colour of the footage to be of a more yellow colour. This was to give the effect that the montage section was from the past and make it more dreamlike. 
To do this we increased the saturation of the picture and the contrast.
A picture of this is below:
Write the steps!

Thursday, 15 December 2011

Editing the lip syncing

In order to ensure we ad all the lip syncing in place, we added the 4 separate sections of the lip syncing in time with the song before we started adding any footage. We locked the layers of the lip syncing to ensure none of it moved out of place and that we could add in any part of lip syncing at any time. Before we locked the layers we found the layers of lip syncing moved across when we added extra footage, hence why we locked them into place. Make sure they were kept in whole clips to ensure they were in time with the song. Furthermore, we included a whole chorus of lip syncing in our music video to express how we were able to incorporate lip syncing effectively.

Wednesday, 14 December 2011

Editing the montage section

Today we edited the montage section, the last section of our video. We wanted to make this section of the film look a lot more upbeat than the rest as it was supposed to be the females happy/positive memory's of her and her boyfriend. In order to make it dreamlike we edited using final cut express to make the image fade into almost white at the beginning of her memory's.
(Shown to the right)


We also cut all of the clips so that they were equal length to further make it look like memory's and to match the time of the music. This is shown in the image below;


Furthermore, to make all of the memory shots look more contrast and brighter than the rest of the video, we also edited these in final cut express emphasising the colour and the contrast shown to the left.


Moreover, we added a vignette in order to make the footage appear more dreamy;


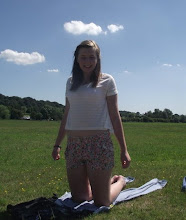
 Finally, although these were not the best shots we could have used, they were perfect for our desired effect of having amateur footage from home footage or someone else's point of view of their memories which is demonstrated below and to the left;


Plan for today

Today In class we are planning on adding in lip syncing up until 3minutes and 14seconds. This is because there are many lyrics to our song, therefore, we are trying to show that we can edit them well. Furthermore, at 3minutes 14seconds we are going to add in our montage section. We are hoping to get most of this complete today. 

Tuesday, 13 December 2011

The Graveyard Section

The graveyard section of the video stands out as it is different to the rest of the video. This is because this section was placed in chronological order, the girl walked to the graveyard to visit her dead boyfriend and placed flowers down, whereas the rest of the video is not in any type of order. To start with we didn't feel as though this section would fit in with the rest of our video. We believed that by changing it to black and white it would stand out. Although when we did try to change the graveyard scene to black and white, although realised it looked tacky and out of place next to the rest of the video.
The Chronological order is shown below;


Monday, 12 December 2011

Editing - potential problems

When we went to London, we planned one section of the song to appear as though the female character was singing at normal speed however, the people in the background were walking in slow motion. This was in order to create a surreal effect, like the world is moving slowly around the girl. In order to do this we sped the song up by 40% and got the female to sing at this speed so that when editing we would add the footage and then decrease the speed by 40%.


However, this did not turn as easy as we would have hoped. This is because once we had slowed down the footage, the lip syncing became jumpy and out of time. Therefore, even though we had created our desired effect of the world moving slowly around her, we were unable to use this footage. 


Moreover, whilst adding the London footage to the editing, we realised the footage did not seem to fit or suit the rest of our footage. This was because so far we had managed to create the vintage effect we had desired by using a lot of crop fields. The London footage did not fit in with this pattern as it posed a more modern look, losing the girls sense of isolation and the sad effect. 

Adding the graveyard section of our video

Today during lesson and after school, we were able to complete up to 2 minutes and 6 seconds. We were also able to complete the graveyard section of our video. We were worried to start with that this would not go with the previous section of our song, although after watching through the whole music video so far, we are pleased with the outcome. Some screen grabs of our editing of the graveyard section are shown below:


Above is a screen grab of the actual editing, we have included parts where it changes to the female character singing in order to avoid the video becoming boring.


Above is a screen grab of a shot of the female character walking towards the grave by herself.


Finally, above is a shot of the female character placing flowers on the grave, this is in order to create emotion and let the audience know that her boyfriend has died.

Sunday, 11 December 2011

Analysing the results of my survey

My survey monkey for music video's was taken by 8 Female's and 6 Male's. Most of the participants were in the 16-18 age band, as expected as the majority of people I asked to answer the survey were of this age. When asked if the participant would go out of their way to watch the music video to a song, the majority,71.4%, answered yes. Moreover, when asked on a scale of 1-5 (5 being the highest and 1 being the lowest) how important do you think a music video is to promote the song, an equal amount answered 4 and 5, both 35.7% of the participants. When asked what they think makes a good music video, there was a variety of answers. The most common were; being cute, emotion, excitement and controversy. This pleased us as we are hoping to include most of these within our music video.


Below are a few wordle's I created of what you think makes a good music video and why do you like music video's:


What makes a good music video?


Why do you like music video's?


Checking my survey results again

Today I checked my survey results again in order to see if I have enough responses to make a wordle of the results. 
I found that I have 14 responses;


Although this is still  not a lot of responses, I have decided to create my wordle with just these results as I doubt I will gain many more responses and each member of our group have created a survey monkey. Therefore, overall we will be gaining more responses.

Friday, 9 December 2011

Filming

We discovered as we are doing such quick and short editing, we may not have enough filming to fill all the gaps.


Therefore today we went out to film more of just the female character over central park and Eastbrook end.


Below is some pictures of the filming and setting we filmed in:


We are hoping that we now have enough footage to carry on and complete our quick editing section.

Tuesday, 6 December 2011

checking the results from my survey

Today I checked the results from my survey monkey in order to analyse the results in order to gain further audience research:


As you can see from the image above, I was fairly dissapointed to find I had only had 3 responses. I therefore inboxed a group of people from my media class in order to gain more responses quicker:


Hopefully this will gain me more responses, and I will analyse these results when they are obtained.

Continuing editing

Today we carried on editing our footage, hoping to get at least 1 minute 30 seconds complete. We were also able to include a graphic match into our editing which we believe makes it look more interesting.
Above is the first half of the Graphic match, this will be the first image which will dissolve into a second image.

Above is a picture of the Transition of graphic match showing the first picture dissolving into the second picture.

Above is a picture of Locking layers, this is in order to ensure the footage of the lip syncing does not move out of place.


Above is an image of the beginning of our video, we have decided to include a wide variety of quick editing, you can see this clearly above. This image also shows how we have used the layers in order to put the lip syncing in time with the song to be able to cut it in at any point, we done so by using vertical editing.


Above is the final image of the graphic match, this shows us using the pen tool in order to get the dissolve between the two images in order to create the graphic match. 

Friday, 2 December 2011

Editing

Today in class, we carried on editing our footage. Some pictures of our editing are shown below:


We were able to edit the first 30 seconds of our song using quick editing of a montage of the footage we collected. We are hoping to carry on editing next lesson and achieve at least a minute of our music video.

Thursday, 1 December 2011

Adding footage and editing

Today during lesson we added all of our footage on the computer and began editing. We can't begin to slot the pieces of footage we have with the song yet as we haven't yet filmed the lip syncing part of the video. We are hoping to do this over the weekend. Below is a print screen of part of the editing we are currently doing:


From the image below, you can see we have a lot of footage to edit. This is an advantage as we are able to select from a variety of different footage and definitely know that we have the right amount of footage.